Efficient Quilt Piecing Techniques
I’m just beginning a Christmas gift quilt so I can’t show you the finished image yet, but this one has a ton of repetitive piecing. A TON! You know the type: Cut 28 each of these 4 different width rectangles at 2.5”, 3”, 3.5”, etc. And cut 128 2.5” x 2.5” squares. Oh, and you need to keep them all organized and sorted. I literally spent almost 3 hours on my feet today standing in front of my cutting table. This isn’t all of it. There’s sashing and borders on another table across the room.

In my short life as a quilter, I’ve discovered that my natural tendency to be a bit organized is a benefit. “A bit” ha ha. Even though I’m not one, I have a master’s degree as a Medical Librarian which is the ultimate in organization. Maybe that’s why those Alpha Bitties called to me. For the longest time, my thriftiness got the better of me and I just used tiny post it notes, but I found these little gems on sale somewhere and I really like them.
Cutting efficiency is everything when doing a project like this. This pattern didn’t use a pre-cut so I ironed all the yardage before I started but I left the bolt fold un-ironed. I normally leave the fabric folded in half as it came off the bolt and cut all selvages right away in one fell swoop. That saves time cutting them off on each WOF (width of fabric) cut. I normally cut multiples if possible as well. So let’s say the pattern calls for 12 of something that is the same, I’ll stack 3-4 folded identical width cuts and cut the needed amount. And I always start with a fresh rotary blade for these projects.
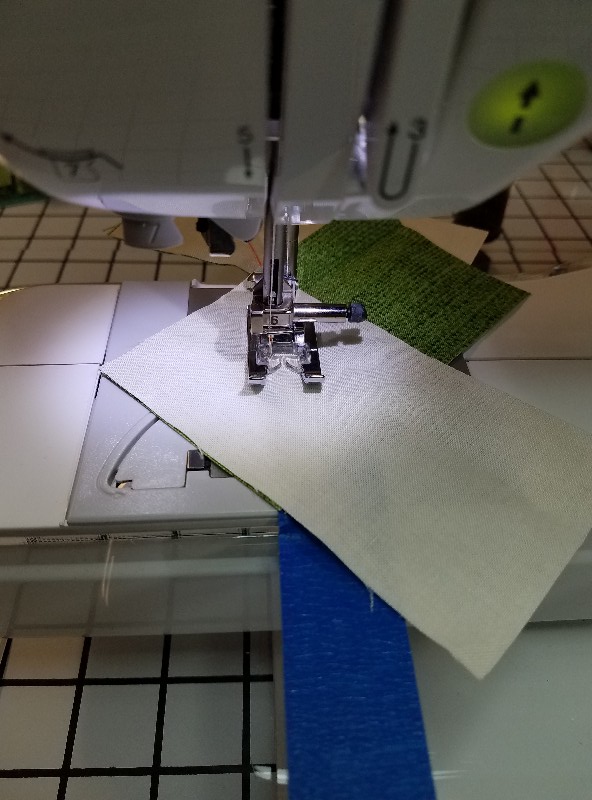
Sometimes Needle Center isn’t always the best spot on my machine for these projects. In this case, I wanted to use the Needle Left because there is a guide mark on the face plate for the ¼” mark on this machine that is ¼” to the right from Needle Left. I normally remove the presser foot and lower my needle into a Scant Quarter Inch Ruler. The mark on my machine’s face plate is exact to the stitch line on the ruler. Pretty cool huh? I put a strip of painter’s tape down the front of my machine from that mark to use as a guide.

The instructions in this case said to begin at the top inner background corner and sew to the lower left corner. On the first one, I always draw a stitching line with a Frixion pen so I get it right. The rest of the pieces don’t need the line after that. That’s a HUGE time saver. The trick here is two-fold: line up the lower left corner first and snug up the starting point against the needle, and don’t watch the needle while sewing. I watch the lower left corner of the piece to make sure it stays true to the edge of the painter’s tape.

My sewing method is to chain piece and do as much as possible in one go. I cut them apart on the cutter on the side of the machine and do as many as I can hold at once.
When I have a large chain piecing project, I always set up a cutting and ironing station right next to my machine. My ironing surface is an old board covered in batting and extra fabric from my first grandson’s nursery. He’s six now. 🙂 I have a small travel iron, a small cutting mat and cutter, and ruler if needed in this work space.

I normally don’t use a ruler to cut whatever needs to done. That takes too much time.

After I cut one piece, I toss it to the side with the darker fabric to the top. This way I can iron and press the seam allowance to the dark side without having to flip the fabric around when I’m ready to iron it all. I do take the extra time to finger press the seams open after I set the seam with the iron. I finger press to prevent the fabric from going wonky as I give it a final press.
Check out that perfect quarter inch!