#SEWHAPPYSAL Block 1 – Star Block
I decided to follow along with the @FatQuarterShop on their Sew Happy sew along.

I recently picked up a couple of FQ bundles of Lori Holt’s Stitch fabric, and thought this would be a nice, easy, and fun addition to my new sewing studio. I’m thinking about changing the orientation of the entire quilt to vertical vs. horizontal so it will hang on my sliding barn door. The jury is still out on that but I think I can center the machine under the word “Happy”. Or maybe add another star block next to the sewing machine…decisions…decisions. Don’t tell anybody, but I didn’t have the right light green for the star HSTs so I snagged a piece from a Lori Holt Prim bundle. ssshhhh Maybe the Quilt Police won’t notice.

Fat Quarter Shop has broken the project into six fairly manageable weeks. Here’s the schedule. Week 1 is the Star Block.
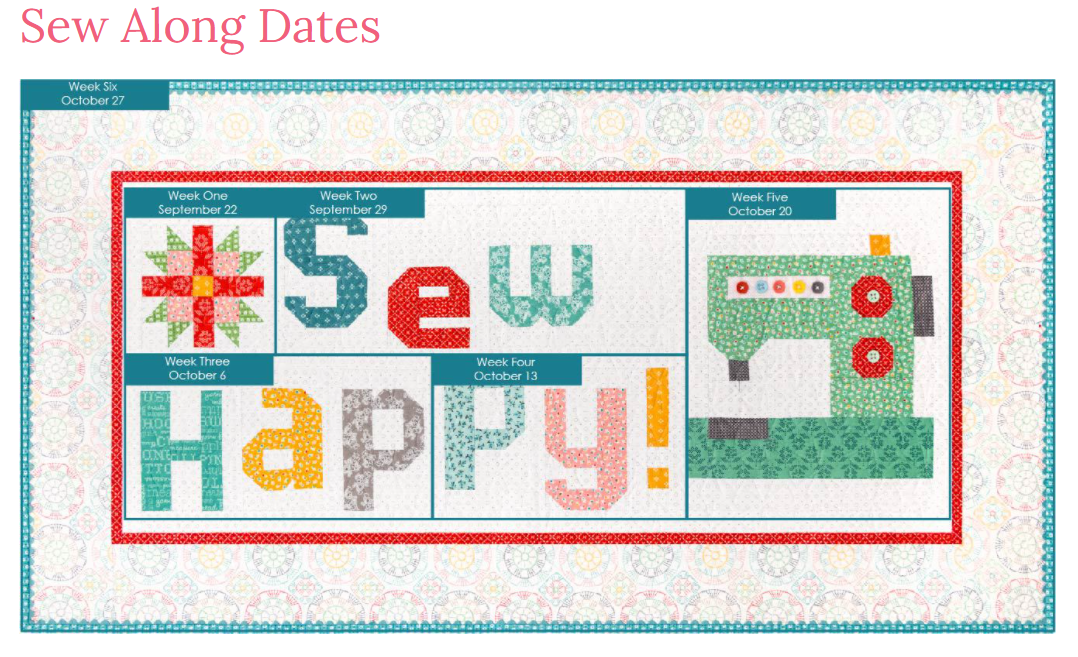
The cutting instructions for the star and sewing pattern are on page 5 of the free pattern at FQS.
You’ll need Lori Holt’s “Spelling Bee” book in order to make the letters and the sewing machine. You can see the sewing machine up in the top corner of the image below next to the “Aa” block.

I also ordered 1.5 yds of the Cloud Crochet yardage for the outer border, .5 yard of Stitch Cottage Daisy Chain for the binding, and 1.25 yds Bee Backgrounds Pewter Stitched Circles for the block backgrounds. You’ll want the buttons for the sewing machine too.
This is a very easy block. Everything nested together nicely and I used my “landing strip” method to mark lines on the “V’s” so as not to tip the points on the green star. Before you start sewing, mark a landing strip to aim your needle directly at the point.

When drawing the line on the back of the eight 1.75″ fabric B, be sure to make a mark on the short side before removing the ruler (the piece that’s showing out from under the ruler) so that’s the corner you trim off. That technique makes all the difference in the world.

The finished block should measure 6.5″x 6.5″.

POST UPDATE: Since posting this and discussing it on my latest video, I’ve gotten a lot of comments and emails about the marking method I used above. Here are some helpful videos and the corresponding segments in them to assist and give you a visual demonstration.
There’s two parts to getting these points right.
► Start at 6:00 minutes on this video: https://youtu.be/odHRWcseLsQ
► Start at 5:36 on this video: https://youtu.be/Vwjm2K0rLVE
This was a fun way to spend the morning with a cup of coffee. I’m looking forward to next week!


That will be great , I need to the alphabet book of Lori’s
I have mine cut out, and plan to work on it while at quilt retreat next week.
Can’t wait to see! It will look great in your room!
I like your idea of vertical versus horizontal, I think it would look great.
Thank you!
Becky, are you going to be out “leader” and show us how you use the Scan n cut on Lori ‘s shapes?? I like your idea of a vertical sign. It would go great on the door to my sewing room. Interested in how you do this.😊
Ohh, I’ve never used Lori’s shapes. I have some around here somewhere but I’m not sure how I’d use them in the SNC. Hmmm, I’ll have to think about that. 🙂
I was thinking of the vertical way also looking forward to see what you create
Love this project! Would you explain again marking your squares from corner to corner. I know one is smaller than the other but can’t remember how you deal with that.
Sure! Place your ruler diagonally on the wrong side of the fabric and mark your line as usual. But before you remove your ruler, make a little mark on the triangle piece of fabric that is not under the ruler – the part you can see and mark on. This identifies this half of the fabric as the smaller half. When you position your square to sew, make sure that smaller half is positioned so that’s the piece that will be cut off (it should be toward the outside corner vs. the middle of the background fabric). Sew on the line. Before you cut, fold the larger half over so that all outside edges meet and you can be sure that everything fits. Then trim off that smaller half and the background fabric. Hope this helps!
Becky…thank you so very much for the vertical vs horizontal orientation suggestion! I wasn’t going to make this because I had no place to hang it. Doing it vertically makes a huge difference! I’m all in now! This is the first time I’ve heard of marking a “landing strip”. I kind of get what you’re doing by looking at the pic but do you have a detailed video showing how to do it? I’m sure it will make a big difference in not cutting off points, Thanks so much. Deb
Sure! There’s two parts to getting these points right. Start at 6:00 minutes on this video: https://youtu.be/odHRWcseLsQ
Start at 5:36 on this video: https://youtu.be/Vwjm2K0rLVE
Great videos Becky! I’ve “thumbs up” and saved both videos for future reference. Definitely going to follow your suggestions for both. Thank you!
Good Morning Becky I am trying to follow along with you on Kimerbells Table Toppers and need some help I have my snowman on USB drive it comes up on the Scan n Cut screen but I can not get the pieces to move separately. My design wants to move all the pieces t the same time. What am I doing wrong? I love your video and have learned alot from them.
Nancy